Tuesday, October 29, 2013

a side dish: green tomatoes

It's that time of year when the tomato plants are on their last days of providing vine ripened fruit, yet there is still an abundance of green fruits hanging. And whatever would one do with green unripe tomatoes? Plenty of things actually. You just have to be a little creative and think outside the ripe tomato box.
last of the moonglow and principe borghese tomatoes

From a cookbook lent by a CSA member:

The Gardener's Community Cookbook
compiled and written by Victoria Wise

one of our CSA members has lent me one of her favorite cookbooks for some time and I've been trying to figure out what recipe to post. There were plenty of tasty sounding recipes, but I just couldn't decide. When we went out into the garden and gathered the last of the green and half ripened tomatoes, my mind started to wander toward what we will do with this green abundance.

The following are two recipes from the cookbook lent by a member.

Green Tomato Relish

1 pound green tomatoes, finely chopped
1 1/2 pounds onions, finely chopped
1 1/2 pounds bell peppers, assorted colors if possible, finely chopped
1 large jalapeno, stemmed and finely chopped
2 tablespoons of pickling salt
3/4 cup of sugar
1 cup of distilled white vinegar
3/4 teaspoon turmeric
2 tablespoons pickling spices tied in cheesecloth

1. Place the tomatoes, onions, bell peppers, jalapeno, and salt in a large bowl. Add water to cover and set aside to soak overnight at room temperature.

2. Next day, drain and rinse the vegetables. Set aside.

3. Prepare 3 pint jars and lids for canning

4. Combine the sugar, vinegar, turmeric, and bag of pickling spices in a large nonreactive pot and bring to a boil. Add the drained vegetables and return to a boil. Remove from the heat immediately and ladle into the jars. Seal and process in a hot water bath for 15 minutes. Or cool, cap, and store in the refrigerator. Will keep in the refrigerator 6 months, 1 year if processed.

For pickling spices:
any of the following will do depending on the flavors you prefer: all spice berries, bay leaves, black peppercorns, cloves, coriander seeds, mustard seeds, red chili peppers, ground ginger, celery seed, dill seed, cinnamon, cardamom, mace, white peppercorns

 Green Tomato Chutney

2 pounds green tomatoes, rinsed and quartered
2 pounds tart green apples, such as Pippins, peeled, cored, and quartered
1 pound shallots, peeled
2 heads of garlic, peeled (20-24 cloves each)
6 fresh red chili peppers, stemmed and seeded
1 inch piece fresh ginger, coarsely chopped and tied in cheesecloth
1/2 pound of golden raisins
1 pound Demerara or other crystal-form brown sugar
2 1/2 cups distilled white or cider vinegar

1. Put the tomatoes, apples, shallots, garlic, and chilies through a  mincer or finely chop in a food processor, taking care not to over chop them into a mush. Transfer to a nonreactive canning kettle or very large pot.

2. Add the ginger, raisins, sugar, and vinegar and slowly bring to a boil over medium heat, stirring from time to time. Lower the heat to maintain a gentle simmer and cook for 1 hour, or until all the ingredients are soft and the mixture has thickened into a loose syrup.

3. Meanwhile, prepare 4 quart jars and lids for canning.

4. Remove the ginger bag and ladle the chutney into the jars. Seal and process in a hot water bath for 15 minutes. Or cool, cap, and store in the refrigerator. Let mature for 1 month before using. Will keep up to 1 year if processed, 6 months in the refrigerator.


A classic dish to make with green tomatoes is to bread them and fry them up for fried green tomatoes. Here's my take on the recipe:


Baked Green Tomatoes

4-many medium to large sized green tomatoes (1-2 tomatoes per person)
1 small handful of flour (I've had success with just about any flour, white flour is typical, but I like cornflour and coconut flour)
1 Tbsp tapioca flour or cornstarch or arrowroot (optional really)
salt
herbs chopped finely as desired (rosemary or sage or thyme or basil are great)
oil (canola or olive oil or even coconut)


Preheat oven to 350-400degF
Cut up your green tomatoes into large rounds about 1/2 inch thick. In a small bowl, mix your flour, tapioca or cornstarch or arrowroot, salt, and herbs. Drench each tomato slice on each side with the floury mixture.


Oil up a baking pan or cast iron and place each flour drenched tomato on the dish. Drizzle some oil over the tops of these tomatoes. Place in oven and bake for 25-35 minutes depending on how crispy you like your tomatoes. Toward the end of baking, flip your tomatoes if you want each side a bit more browned, but this isn't necessary.


Serve as a side with any dish. These are excellent on top of soups or pastas or hearty grain dishes. And there really is no limit to experimenting with different flavors, so your green tomatoes can have curry spices or savory spices or possibly even sweet spices. The flavor of the green tomatoes themselves lends a sour lemony sweetness that gets almost caramelized when baked. So delicious, we don't have to feel too bad that ripe tomato season is on its way out, if we get to enjoy these green tomatoes for a few more weeks.


Green tomato storage

Storing green tomatoes during the winter involves some storage space and some containers, but not much else. One thing to keep in mind is that you have to be vigilant about culling any rotting or bad tomatoes so that it doesn't spoil the whole box. Ideally, you would place tomatoes in a box in a single layer, but last year we even just put them into a bucket and just pulled them out every week to check for "going bad" tomatoes. Your green tomatoes will ripen over time and you can sort them by ripeness: greenest at one end of box or bottom of bucket and yellowing/yellowist at other end or top. A cool, dark place is ideal for storage. Most people don't have a root cellar around here, so even the kitchen cabinet or pantry does great.

Any other classic recipes or new recipes out there involving green tomatoes we should share?

Wednesday, August 21, 2013

A side dish: Costata Romanesca Summer Squash or three + let me count the infinite ways

Summer time often means that it is time to figure out what to do with those summer squash that just keep growing and manage to hide out in the large leafy plants and before you know it you have a monster summer squash on your hands. 

We really enjoy this Costata Romanesca variety of summer squash. We think it has superior flavor to a zucchini and is prolific and we like that when it is cooked it maintains its shape rather than disintegrating into mush. The unfortunate thing (or fortunate thing?) is that they can get rather huge if unnoticed or forgotten about on the plant. In one week's time, a squash that was tiny and still had its flower on the end can get to be over a foot long and very large around. 

We usually just cut up a large chunk at a time with the big ones and use it as needed in a dish, saving the rest in the fridge for another dish. Here, we wanted to share with you some easy methods to prepare a summer squash.


A side dish: pan roasted summer squash with rosemary
large summer squash
olive oil
rosemary
salt

Begin by chopping your squash into nice sized wedges.


Drizzle with olive oil, dash of salt, break up your rosemary and sprinkle onto the wedges.
Bake for 30+ minutes until squashes have are baked to desired doneness.


Enjoy on the side with many meals.

A side dish: squash, green bean and garlic tempura

 summer squash chopped
green beans stems removed
garlic cloves peeled


2/3 c white flour
2/3 c arrowroot or cornstarch
2Tbsp baking powder
1 1/2 tsp salt
1/2 tsp pepper
1 c carbonated water or beer (we used beer for this recipe)
extra flour for dredging veggies

canola oil

Mix all dry ingredients and add carbonated water or beer gradually until consistency of mixture is a light batter. Dredge veggies into flour and dust off excess. Dip floured veggies into tempura batter. 


Deep fry in enough oil to over a few tempura battered veggies at a time.  Too many wet veggies will lower the temperature of the ot oil and the tempura won't cook as well or evenly. Do this in small batches and drain onto paper towels or onto a cookie sheet.


tamari
brown rice vinegar
toasted sesame oil

mix these ingredients for a tempura dipping sauce


Enjoy the tempura veggies on their own or paired with a simple udon noodle soup of veggies, broth and noodles or with a stir fry dish (with summer squash of course!)


A side dish: zucchini butter (or any summer squash "butter")

This last side dish was passed along to me so I can't claim it as my own. But, we did try it out and ate it with a pasta dish. It was very tasty and I would like to make it again since we surely will have more squash.

check out the original posting here at Food52

http://food52.com/blog/7500-jennie-cook-s-zucchini-butter

We substituted the butter with olive oil and instead of shallots we used some multiplier onions and garlic.


And lucky me, with the roasted summer squash and tempura veggies I got to enjoy them cooked for me especially. What a treat! Hope you are also enjoying the many ways for cooking summer squashes this summer season.

What recipes do you love to use?

Enjoy!

Sunday, July 28, 2013

A meal: a summer greens and herbs pizza or I think that weed will taste good on my food

Many of our leafy green vegetables are winding down as the summer goes along. A walk around the garden before dinner yielded a variety of tasty leftover leafy greens that once they were brought into the kitchen were perfect for a summer greens  and herbs pizza with summer squash and broccoli and green huatusco peppers. You can find a pizza dough in an earlier post. 

The pizza:

costata romanesca squash
broccoli
kale
radicchio

basil
garlic
green huatusco peppers

summer savory
puslane
magenta lambsquarters
oregano flowers
multiplier onions

pizza dough
olive oil
salt


Now you are probably wondering what the heck is purslane and magenta lambsquarters. Well, they seem to be all the rage with gardener's these days. Some gardeners may call them weeds. On the farm they pop up here and there or sometimes everywhere. While we never sowed the seeds or wanted to grow them ourselves, we seem to be stuck with them as "weeds that are edible". 

Purslane is a fleshy herbaceous plant in the Portulacacea family that likes warm weather. Like a Farmer's Almanac saying, Yeti has always said, "when the purslane is beginning to grow in the garden it is time to plant the peppers." And now it's all over the place. 
Purslane is a pretty common culinary delight in European and Asian cooking and has a sour salty taste. It is a nutritious leafy green that is high in vitamins A, C, and B and is apparently very high in Omega-3 fatty acids. It is also a medicinal in Traditional Chinese Medicine. Here's a fun little website with some purslane info. 


Magenta Lambsquarters is in the Chenopodiacea family much like Amaranth and Quinoa. This plant is also called spreen or tree spinach. It has a mild spinachy, somewhat bitter, somewhat sour flavor to it. It certainly looks amazing with its magenta purple growing tips, you can't deny it that! It also is highly nutritious. Here's another blog article about lambsquarters and some other tasty things you can do with the leaves and seeds.


All the vegetables were chopped and sorted into bowls and plates according to when they would go onto the pizza.


First was the pesto of basil, garlic, huatusco peppers chopped with the mezzaluna very fine and olive oil as the "sauce" layer. Then the big vegetables of squash, broccoli, and leafy greens of kale and radicchio and sliced multiplier onion. The whole pie was drizzled with olive oil and a dash of salt before it was placed on my new copper pizza pie pan (I got it at an antique store in town for $10! What a deal!) in the oven and baked at 400degF for at least 20 minutes.


In the last 5 minutes I tossed on the herbs of summer savory, purslane, magenta lambsquarters, oregano flowers.

The meal:

The new copper pie pan was a success. The pizza turned out delicious and was accompanied by our homemade pickled carrots and some olives. The purslane and the magenta lambsquarters sort of melded into the other veggies so we couldn't place them taste wise individually, but it was still a tasty "weedy" meal. Yum!

What weeds have you cooked with?


A member's dish: a salad with roasted beets with feta mint and pistachios

We have a special recipe that was shared with us by some of our CSA members. They sent us a gorgeous photo of this dish featuring our chioggia beets and we thought we would share it here with you all.

The dish: 

arugula
roasted beets
feta
pistachios
mint
shallot dressing


This dish was inspired by a post from another blog called TasteFood and the original recipe can be found there.

With the farm and food blogs, we also wanted to share with you a little about some of our members as they send us recipes or interesting information. We are hoping that in this way, we as the farmers and you as the members, and the rest as family, friends and the greater community who stumble upon our blogs can begin to connect. Connecting is a way for us to support you in your endeavors, just as you are supporting us in our farming endeavor.

So, today we are sharing the website of Chris Brigham. With an emphasis in photography in college and an early career as a graphic designer, he now builds affordable and minimalist furniture out of his workshop Knife & Saw in San Francisco. Take a look at his simple yet stylish (and very practical in a bike filled city) bike shelf design that won in the Play category for the Modern World Awards in 2011 from Dwell Magazine.

We'd like to thank our dear family friends Chris, and his wife Tina, their young son Zane and newborn daughter Finley for supporting us (and sending us beautiful photos featuring the fruits of our labor in action!).

Friday, July 5, 2013

A meal: summer potpie or not as complicated as it may seem

I got the crazy idea to make a summer potpie despite the heat wave we have been having. Who bakes in 90 degree weather? Well, I would if I really wanted to make something. And I really wanted to make a surprise potpie. 

I hadn't planned on posting this on the blog, so it was an afterthought to take photos. But, I managed to get just a few to give an idea of a summer potpie. 

Basically, the plan was to make seitan nuggets first and fry those and then quickly chop up and fry some vegetables in the cast iron, make a quick and easy biscuit dough, roll it out to a top and bottom layer, put the dough in the smaller cast iron, toss the goodies inside, top it with the dough and stick it in the oven. The dish has many elements and could be relatively messy, but they were also quite simple to do. The basic idea is that you can put anything you like inside the potpie, whatever vegetables are on hand, the key is just making dough and assembling it.

The Goodies inside:
seitan chunks rolled into small nugget size (seitan is wheat gluten and we make it using vital wheat gluten and anything can be added to it to spice it up)
all veggies chopped:
carrots
broccoli
summer squash
king trumpet mushrooms
onions
garlic
herbs chopped:
basil
dill
salt
water
dash of flour (I used coconut flour. The flour is what gives it a gravy-like broth. The coconut flour gives it a yummy sweetness)

The above ingredients were prepared and then tossed into a cast iron with olive oil on medium high. They were browned as I made the dough. Midway through, I added my herbs, salt and a small handful of coconut flour to the veggies and seitan and stirred those up and then just enough water to simmer the everything until it makes just enough of a broth to keep everything moist as it bakes in the pie.

The Dough:

Any biscuit dough recipe can be used. The idea here is to cut the dough ball in half and roll it out to make a top and bottom layer just like a pie. I made my dough just by tossing in ingredients until I thought the consistency was right, but I'll do my best to give the basic idea.

1-2 c of flour (any kind can be used. I've used white, corn, coconut flours with excellent success. The amount of flour depends on how big of a baking dish you use)
salt
5-6 Tbsp vegetable shortening
1/2 - 1 c water 

Mix up the salt in the flour. Chop in the vegetable shortening with two knives to mix the the flour and shortening. Add the 1/2 cup of water (or more if you used more flour) a little at a time and continue chopping in with the knives. Eventually you can use your hands to knead the dough. Cut dough ball in half and roll out pieces using a little extra flour to keep it from sticking. 

The Potpie:

Once the dough is rolled and the veggies have had a chance to stew for a little bit, it's time to assemble. I had turned on the oven to 400 degrees around the time I had started to fry up the veggies. I placed the small cast iron on the stove top burner while it was still on and laid the bottom layer of dough in the pan. The dough began to puff just a little and then I put in the stewed seitan and veggies. 


The rolled out dough for the top of the pie was then placed on top of the ingredients. Don't worry about making the dough fit perfect for the bottom and the top. You can just smoosh the dough together a little around the edge of the cast iron and as it bakes it will seal. 


Poke some holes using a fork to allow steam to escape as it bakes.


Place the pie in the 400 degree heated oven and bake for 30-45 minutes or until top of dough is golden brown.


Once the pie has baked it is time to assemble the meal!


The Meal:
The pot pie was carefully cut in quarters and plated, a salad of cabbage, radicchio, olive oil, lemon and salt had been chilling in the fridge, and was paired with olives, purple radish, and a bottle of 2006 Super Tuscan from Picchetti winery. It really wasn't as complicated as it could have been and was so worth it even with the heat outside!

This meal turned out so delicious that I have now made it many nights and created numerous variations.  In the most recent version I added to the dough, black beans, strips of summer squash flowers, basil and  dill. So yummy!
Enjoy!


And just for fun, I had posted a picture of a monster of a radish on Instagram that I had pulled from the garden. 


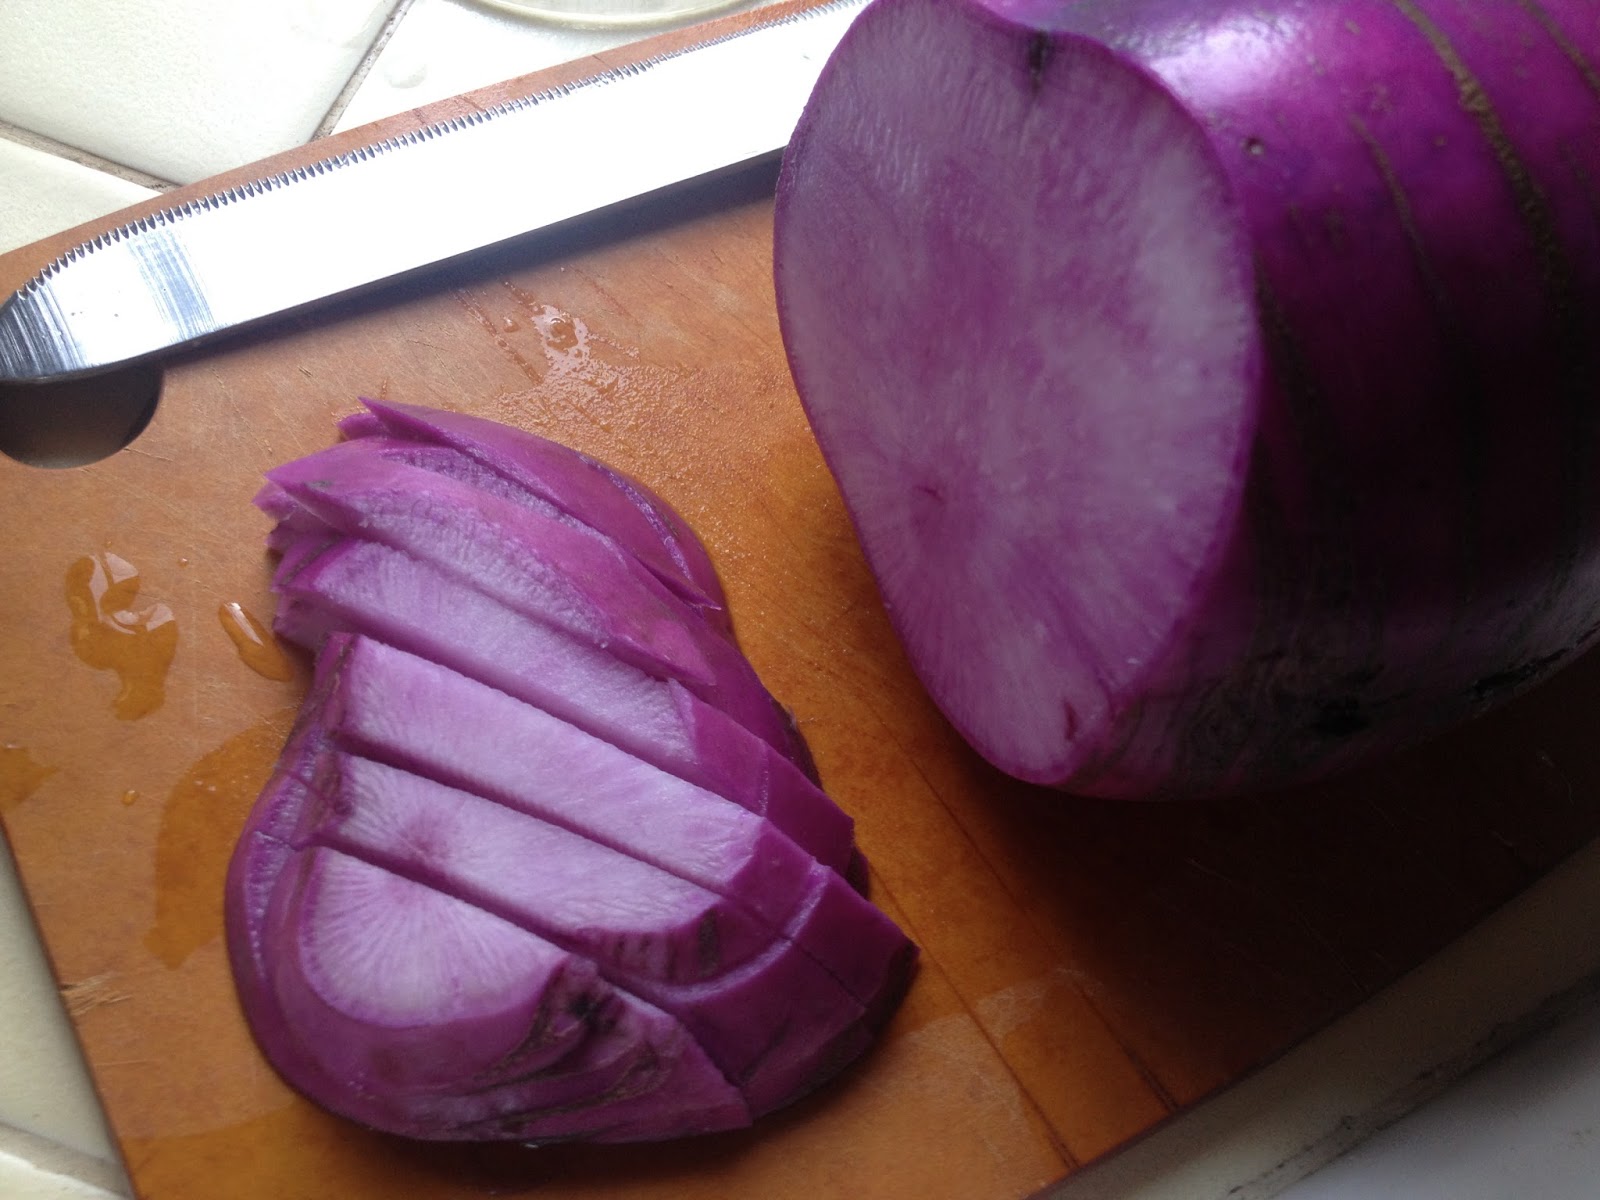
Now, I had sown seeds of watermelon radish and this radish is purple through and through and humongous and is so not a watermelon radish. Obviously a rogue seed of some other radish variety hopped on board with my packet of radish seeds and ended up in my radish bed. Unfortunately, we have some garden pests that don't allow us to grow good looking radishes. I love radishes and so it's hard for me to let it go and not grow them. I decided that this radish, despite it's size, looked relatively good even though I didn't choose to grow it. I lovingly took it home and washed it clean and cut it up. Not bad! Nice and juicy and crisp and spicy. Lovely color and we have been eating it for days, slicing off a round and dicing it into pieces. I'll be sad to see it go...
Thanks for hopping on board rogue radish seed!

Wednesday, June 26, 2013

A meal: roasted vegetables with a version of pesto or how to use imperfect vegetables and still make a delicious meal

We love roasting vegetables around here. You can use just about anything with this type of meal and then if you happen to have leftovers you can revive the dish into a new meal by adding a grain, pasta or tossing them into a big pot of water and making a soup (which is actually what we did the next night and added pasta shells to make it minestrone like). For this meal I also made a variation of pesto, which just means I had basil and garlic and then added some other leafy goodies because I didn't want to compost them.

We are looking forward to having these vegetables in the upcoming CSA boxes! One of the things about preparing for the CSA box for the week is to try out the vegetables that are just starting to come on board and that are ready to be picked. The scallions are ready to be picked and the radicchio have been waiting for their turn as well. As the farmers, we have to try things out ahead of time to be sure they are ready, while at the same time we often bring home the vegetables that are past their prime or have some "imperfections" or in the case of the carrots were not "the perfect carrot". So in this meal, we had some carrots that lost their tops and so don't look "carrot perfect" for a box, some broccoli that was left a little too long on the plant and was starting to flower (although the flowering broccoli is still very tasty and pretty) and the radicchio were plants I had pulled out the day before and left on a pile of radicchio leaves next to the bed to give some room to some other radicchio they were crowding and I pulled away all the icky leaves surrounding them to reveal perfectly good small heads of radicchio below! I couldn't let them go to waste and so they became a part of this meal.

The Ingredients:

From left to right here's what we had in this meal.

carrots - Cosmic Purple
radicchio - Palla Rossa
scallions - Deep Purple and Welsh
garlic - California Early
broccoli - Green Sprouting (and partially flowering)
beets - Chioggia
greens - beet tops, basil Genovese, kale Lacinato

also:
olive oil
salt
lemon


The Roasted Vegetables:

Begin by chopping the bigger and firmer vegetables to be roasted. Here we have the broccoli, carrots, beets, scallions,  and garlic. The garlic was peeled, but left whole. I peeled at least 5 cloves. The scallions had their tops removed and reserved for the pesto. The same with the beet greens.


I do a variation of my Dad's 3x cooked vegetables by doing a 2x cooked and eliminating the 2 minute boil for this dish and starting with a quick browning. I start with a very hot cast iron skillet and add olive oil (a very generous helping of olive oil!)


Brown all sides of the vegetables in olive oil.


I took those vegetables out of the cast iron after they were browned and placed them on my preheating pan in my oven. I cook at 400 deg F.
I then tossed my broccoli into the hot cast iron and browned that for a couple of minutes before removing it and adding the broccoli to the pan in the oven.


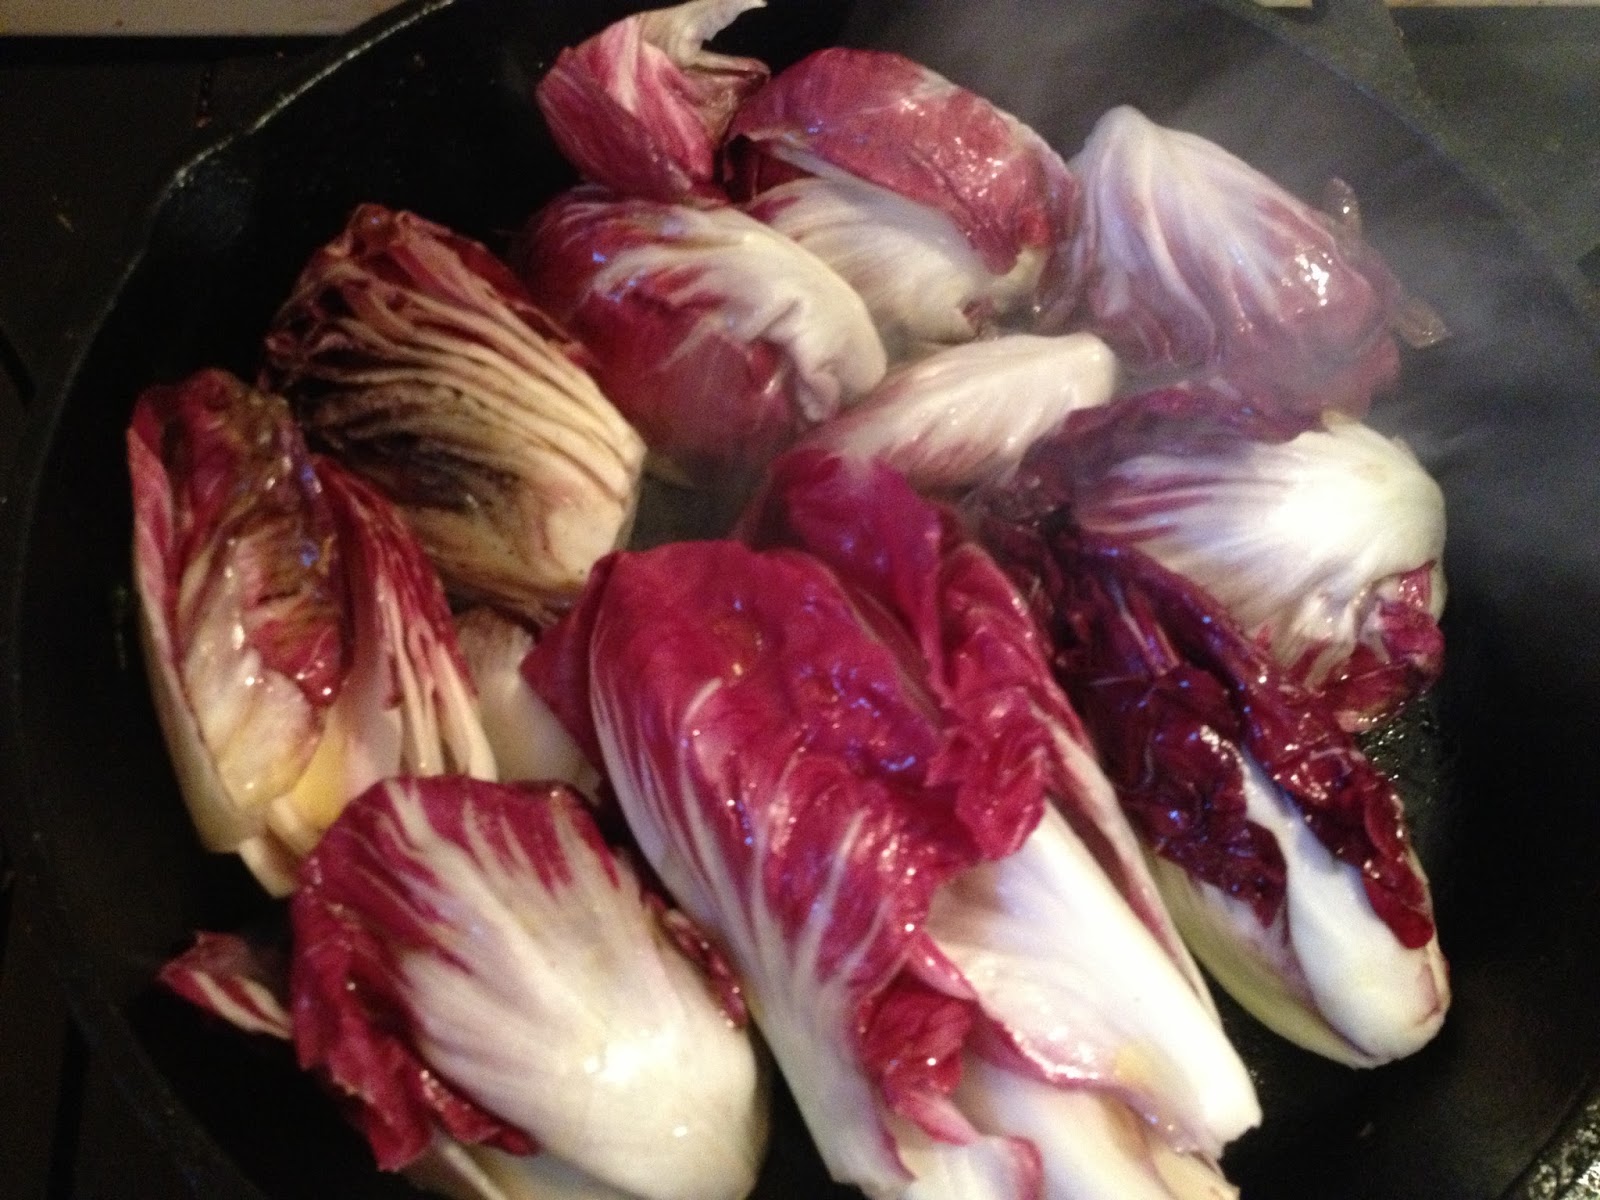
 I then sliced the radicchio heads in half


Placed them face down on the cast iron and let them sizzle  for a couple of minutes


Then carefully flipped them, so that they didn't fall apart and browned the other side.


Then added the radicchio to the pan in the oven. By now the carrots, beets, scallions, and onions have been roasting the longest and should be starting to get nice and caramelized. I then added some salt to the roasting vegetables before closing the oven and turning my attention to the pesto ingredients.


The Pesto:

scallion tops
kale leaves
beet greens
basil
garlic cloves
lemon
salt 
olive oil


I began by using my mezzaluna to chop up the garlic first. I chopped the cloves just enough so that they would get chopped smaller and smaller as I added each green.
Next I added the scallion tops and chopped those just a little.


Then the kale and chopped just a little


Then the beet greens and chopped just a little. I then added my healthy drizzle of olive oil, dashed on plenty of salt, and squeezed half a lemon.


And then begins the project of using whatever chopping device you have on hand (I sure do love my cheap, $5, found on a bottom shelf, discounted mezzaluna for fine chopping) and chopping to desired fineness all the pesto ingredients by mixing and chopping, mixing and chopping.


Once the pesto is finely chopped, it is time to turn off the oven and begin to put together the meal.


The Meal:

The roasted vegetables were divided up and carefully placed in our bowls, the center was topped with a generous helping of pesto, crusty bread was sliced and toasted, our dipping sauce was even more olive oil (we sure do love it) with some spicy roasted pepper salt. We paired it with our 2nd bottle of Torrontes (the $0.5 bottle) and sat down to finally enjoy the evening. And even though the vegetables we took home to make dinner were not up to our standards for a CSA box, they still turned into a delicious meal.


p.s.
As I mentioned, the next night we still had leftover roasted vegetables and pesto. I tossed some more chopped veggies into a big soup pot, browned them a bit, added lots of water and the right amount of salt, let that simmer and then added the shell pasta and the rest of the roasted veggies and the pesto and let it all simmer for 10 minutes. That lasted us two extra days! I love meals like that that have many facets and that allow us to have a break from making dinner every night (or at least me from having to make dinner every night!) especially when we are so busy with our farm and work. 

Enjoy!

Saturday, June 22, 2013

A side dish: simply cabbage slaw

I thought I would start a new set of small and mini side dish posts. I may have a few to do over the next couple of days (or within the week) to go along with some of the items that are being featured in our CSA boxes.

We are excited to have our first harvest of the cabbages! We are pleased to see how they have headed up. Golden Acre cabbages are well ahead of the Red Acre cabbages we planted at the same time.


We planted the cabbages on April 20th, so it took about 2 months for some of the plants to get to a nice sized head.


Our biggest head that we cut was almost 2.75 lbs!! It felt heavy and dense and we hope that it looks as good inside as it does from the outside.


Once we had finished our CSA box preparation for our saturday delivery, we found a moment to eat some dinner. To go along with our simple and quick meal of black beans, barley, carrots, onion, garlic and sprinkled with fresh basil, we were finally ready to cut into one of our heads of cabbage...
drum roll please....


Perfecto!

To accompany the bean dish, a small chunk of the cabbage was sliced off and then thinly sliced, drizzled with olive oil and then a squeeze of a half of a lemon from one of the lemons we harvested from Yeti's tree, dashed with salt and voila! Simply Cabbage Slaw ready as a crunchy, sweet, salty, sour addition to the meal.


The Cabbage Slaw:

Cabbage
olive oil
lemon
salt

Use as much of each ingredient as desired.
I really enjoy all the variations one can do with this simple side dish. I love adding very thinly sliced and diced ginger, thinly sliced onion, additional leafy greens, fresh herbs like basil or dill, pepper, and really just about anything you would put into a salad, but cabbage is the star green.
I'm looking forward to having this slaw tonight with the cabbage and the radicchio we harvested.


Note* I really do not like coleslaw as it is traditionally made. I first learned of this method of slaw when I was traveling through Belize for college and ate variations of it everywhere I went. (I think it has to do with mayonnaise being a bad idea in humid lands.) I think it is especially delicious with bean dishes.