Wednesday, June 26, 2013

A meal: roasted vegetables with a version of pesto or how to use imperfect vegetables and still make a delicious meal

We love roasting vegetables around here. You can use just about anything with this type of meal and then if you happen to have leftovers you can revive the dish into a new meal by adding a grain, pasta or tossing them into a big pot of water and making a soup (which is actually what we did the next night and added pasta shells to make it minestrone like). For this meal I also made a variation of pesto, which just means I had basil and garlic and then added some other leafy goodies because I didn't want to compost them.

We are looking forward to having these vegetables in the upcoming CSA boxes! One of the things about preparing for the CSA box for the week is to try out the vegetables that are just starting to come on board and that are ready to be picked. The scallions are ready to be picked and the radicchio have been waiting for their turn as well. As the farmers, we have to try things out ahead of time to be sure they are ready, while at the same time we often bring home the vegetables that are past their prime or have some "imperfections" or in the case of the carrots were not "the perfect carrot". So in this meal, we had some carrots that lost their tops and so don't look "carrot perfect" for a box, some broccoli that was left a little too long on the plant and was starting to flower (although the flowering broccoli is still very tasty and pretty) and the radicchio were plants I had pulled out the day before and left on a pile of radicchio leaves next to the bed to give some room to some other radicchio they were crowding and I pulled away all the icky leaves surrounding them to reveal perfectly good small heads of radicchio below! I couldn't let them go to waste and so they became a part of this meal.

The Ingredients:

From left to right here's what we had in this meal.

carrots - Cosmic Purple
radicchio - Palla Rossa
scallions - Deep Purple and Welsh
garlic - California Early
broccoli - Green Sprouting (and partially flowering)
beets - Chioggia
greens - beet tops, basil Genovese, kale Lacinato

also:
olive oil
salt
lemon


The Roasted Vegetables:

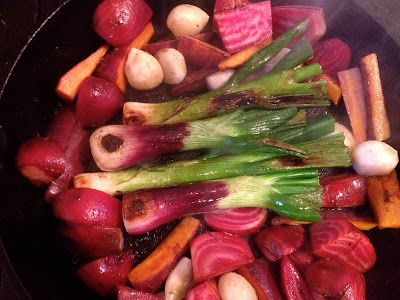
Begin by chopping the bigger and firmer vegetables to be roasted. Here we have the broccoli, carrots, beets, scallions,  and garlic. The garlic was peeled, but left whole. I peeled at least 5 cloves. The scallions had their tops removed and reserved for the pesto. The same with the beet greens.


I do a variation of my Dad's 3x cooked vegetables by doing a 2x cooked and eliminating the 2 minute boil for this dish and starting with a quick browning. I start with a very hot cast iron skillet and add olive oil (a very generous helping of olive oil!)


Brown all sides of the vegetables in olive oil.


I took those vegetables out of the cast iron after they were browned and placed them on my preheating pan in my oven. I cook at 400 deg F.
I then tossed my broccoli into the hot cast iron and browned that for a couple of minutes before removing it and adding the broccoli to the pan in the oven.


 I then sliced the radicchio heads in half


Placed them face down on the cast iron and let them sizzle  for a couple of minutes


Then carefully flipped them, so that they didn't fall apart and browned the other side.


Then added the radicchio to the pan in the oven. By now the carrots, beets, scallions, and onions have been roasting the longest and should be starting to get nice and caramelized. I then added some salt to the roasting vegetables before closing the oven and turning my attention to the pesto ingredients.


The Pesto:

scallion tops
kale leaves
beet greens
basil
garlic cloves
lemon
salt 
olive oil


I began by using my mezzaluna to chop up the garlic first. I chopped the cloves just enough so that they would get chopped smaller and smaller as I added each green.
Next I added the scallion tops and chopped those just a little.


Then the kale and chopped just a little


Then the beet greens and chopped just a little. I then added my healthy drizzle of olive oil, dashed on plenty of salt, and squeezed half a lemon.


And then begins the project of using whatever chopping device you have on hand (I sure do love my cheap, $5, found on a bottom shelf, discounted mezzaluna for fine chopping) and chopping to desired fineness all the pesto ingredients by mixing and chopping, mixing and chopping.


Once the pesto is finely chopped, it is time to turn off the oven and begin to put together the meal.


The Meal:

The roasted vegetables were divided up and carefully placed in our bowls, the center was topped with a generous helping of pesto, crusty bread was sliced and toasted, our dipping sauce was even more olive oil (we sure do love it) with some spicy roasted pepper salt. We paired it with our 2nd bottle of Torrontes (the $0.5 bottle) and sat down to finally enjoy the evening. And even though the vegetables we took home to make dinner were not up to our standards for a CSA box, they still turned into a delicious meal.


p.s.
As I mentioned, the next night we still had leftover roasted vegetables and pesto. I tossed some more chopped veggies into a big soup pot, browned them a bit, added lots of water and the right amount of salt, let that simmer and then added the shell pasta and the rest of the roasted veggies and the pesto and let it all simmer for 10 minutes. That lasted us two extra days! I love meals like that that have many facets and that allow us to have a break from making dinner every night (or at least me from having to make dinner every night!) especially when we are so busy with our farm and work. 

Enjoy!

Saturday, June 22, 2013

A side dish: simply cabbage slaw

I thought I would start a new set of small and mini side dish posts. I may have a few to do over the next couple of days (or within the week) to go along with some of the items that are being featured in our CSA boxes.

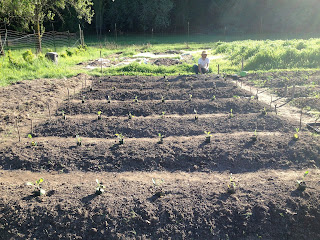
We are excited to have our first harvest of the cabbages! We are pleased to see how they have headed up. Golden Acre cabbages are well ahead of the Red Acre cabbages we planted at the same time.


We planted the cabbages on April 20th, so it took about 2 months for some of the plants to get to a nice sized head.


Our biggest head that we cut was almost 2.75 lbs!! It felt heavy and dense and we hope that it looks as good inside as it does from the outside.


Once we had finished our CSA box preparation for our saturday delivery, we found a moment to eat some dinner. To go along with our simple and quick meal of black beans, barley, carrots, onion, garlic and sprinkled with fresh basil, we were finally ready to cut into one of our heads of cabbage...
drum roll please....


Perfecto!

To accompany the bean dish, a small chunk of the cabbage was sliced off and then thinly sliced, drizzled with olive oil and then a squeeze of a half of a lemon from one of the lemons we harvested from Yeti's tree, dashed with salt and voila! Simply Cabbage Slaw ready as a crunchy, sweet, salty, sour addition to the meal.


The Cabbage Slaw:

Cabbage
olive oil
lemon
salt

Use as much of each ingredient as desired.
I really enjoy all the variations one can do with this simple side dish. I love adding very thinly sliced and diced ginger, thinly sliced onion, additional leafy greens, fresh herbs like basil or dill, pepper, and really just about anything you would put into a salad, but cabbage is the star green.
I'm looking forward to having this slaw tonight with the cabbage and the radicchio we harvested.


Note* I really do not like coleslaw as it is traditionally made. I first learned of this method of slaw when I was traveling through Belize for college and ate variations of it everywhere I went. (I think it has to do with mayonnaise being a bad idea in humid lands.) I think it is especially delicious with bean dishes.

Sunday, June 16, 2013

A meal: Carrot Puree or what to do with all those carrots or how to jazz up leftover pasta before tomato season

So we have a lot of carrots. And I mean, a lot of carrots. People may wonder when we will be done with giving out carrots. And we have more carrots recently sown that will be for future CSA boxes. And we have an empty bed that will some day have carrots specifically for winter storage too.

During the week I had made a huge pot of pasta because I knew that the evening of our friday harvests for the CSA boxes, cooking dinner is just one more thing to do in the kitchen and then to have to clean everything up so we can prepare and package everything is more than we want to deal with. I made it two days before so that in fact we were eating leftover leftovers on our friday night harvest! And it still tasted good.

While the pasta itself is not the focus of this post, I will give the basic ingredients and methods here in case anyone wants to try out a simple non-tomato based pasta. We love pasta with white beans and greens!

The Pasta

1pkg Linguini or Spaghetti pasta or enough for your meal (or any pasta)
1c Cannellini beans cooked ahead of time (or just one can)
(we are crock pot people, always having a pot of beans on the ready for the next day's meal. 1c of dry beans equals 2c cooked)
Greens of Kale, Tat Soi chopped to desired fineness
Onion chopped
Garlic chopped or sliced
Fresh dill
olive oil
salt

Cook pasta in a large pot or dutch oven. Should take about 10 minutes. While the pasta is cooking, cook on medium heat with olive oil the onion, garlic, greens and dill just enough to wilt the greens and to brown the onions and garlic. Add Cannellini beans with its cooking water and salt and turn down heat to low and allow to sit and stew for a few minutes. I did not drain the water from the beans that were cooked in the crock pot and instead added the entire contents to the skillet. When pasta is done cooking, drain pasta and add your entire skillet of beans and greens to the pot of pasta and mix.

In case you are like us, we cook enough for dinner so that we don't have to make or buy something special for lunch or so we can have leftovers for the next evening. As I contemplated the next day's meal, I conjured up this recipe for a carrot puree. It could use a little tweaking, but it was still extra tasty and made the pasta into a new meal.

The Carrot Puree


As with any meal, we like to decide what beverage we think will pair well with the evening's meal. I chose a wine I got from BevMo on a buy 2 bottles, 5 cent deal day. I like white wines that are a bit on the dry side and have a somewhat minerally taste to the tongue. This bottle of Torrontes from Argentina from  the vineyard Machi  seemed to pair well.

Very simple beginnings for this puree.


Carrots chopped (5 carrots worked to make about 2 cups of puree)
Onion chopped (I used half an onion)
Dill chopped
white wine
water
salt


Begin to fry veggies in a skillet. You can begin to heat up your leftover pasta too. I always add a little water to a pot of leftover pasta so that the pasta steams from the bottom rather than burns.


Once everything is browned, then toss it all in the oven to roast while you begin to make your salad. (I love the oven for this very fact that you can let things cook and don't have to pay attention to it. Frying on the stove top, but then finishing off the meal in the oven. More oven cooking recipes are sure to follow.)

The Salad:

Greens (your choice, but here we used Speckles and Deer Tongue)
Onion (less than a quarter of a whole onion)
Peas (small handful)
Carrot (can we use any more carrots in this meal?!)
olive oil
balsamic vinegar 
salt and pepper


Begin by roughly chop your lettuce and place in a large bowl and set aside. Then roughly chopping each of the onion, peas, and carrot. The onion, pea, and carrot mixture is a variation of mirepoix I guess I sort of made up. Mirepoix is a French culinary version that involves onion, celery, and carrots. Most cultural cuisines have some form of a "holy trinity" base flavor complex.


Next drizzle these chopped veggies with olive oil, balsamic vinegar and add salt and pepper.


Using either a good chopping knife or a fancy mezzaluna, begin to chop into very small pieces, mixing the oil, vinegar, salt and pepper as you chop.


Add the chopped veggies to your chopped salad greens and drizzle a little more olive oil or balsamic vinegar and mix. Place in fridge to chill until the rest of the meal is ready.


 The Carrot Puree Continued:


Once veggies are roasted it is time to puree! Add about a half cup of wine to your blender. This ingredient is optional. You can simply use water as well. Begin to blend the veggies. Vitamix brand blenders are awesome for this type of puree. But, they are so expensive that it is like purchasing a car for your kitchen. But, our kitchen wouldn't be complete without it.


Once the carrot puree is mostly blended, I added a bit more water to just below the top of the puree and then the chopped dill and some salt. Blend. And blend. And blend until it is to your desired puree-ness. Add more salt until desired salty-ness and liquid to desired thickness.


Once blended into a puree, I put it back into the cast iron skillet and kept on low to keep it warm until the pasta was warmed through from the oven. All the dill I added made the puree turn into a more yellowish color.

The Meal:

Once everything was prepared, we added our favorite mix of olives, some crusty french bread with olive oil and balsamic dipping sauce and our glasses of Torrontes. Chris said that the finishing touch would have been a sprig of dill carefully placed in each bowl of pasta and carrot puree, but alas I took this photo before he had suggested it! So be sure to add a sprig of dill to your carrot puree!

Enjoy!